So you wanna swap a tube... (Part 1)
----------
Update 11/23/2010 - corrected some minor typos
WARNING: This article is currently considered "BETA" - meaning, it
may be missing a step, there will certainly be typos, and your toaster
may get possesed as part of the procedure. Please use this information at your own risk, and if you see something wrong, please let me know by using the CONTACT ME button at the top of the page.
----------
Table of Contents:
Part 1 - What you need to know about finding a donor tube
Disclaimers
Introduction
Is My Tube Really Bad (Tube Symptoms)
Choosing a Donor
Crunching the Numbers (Tube numbering)
Size Does Matter (Tube Sizes)
The Square Peg doesn't Fit the Round Hole (Tube Sockets)
The Yoke is the Best Part
Disclaimer: As with any articles on
junknet.net, please verify any and all facts before putting them to
practice. I do not claim to be an expert on these topics, merely sharing
what I do know based on my own experiences, forum postings, and from
other knowledgeable folks. Use this information at your own risk.
Safety disclaimer: TVs, arcade monitors and
anything else with a picture tube contain high voltage, we're talking
over 15,000 volts!! Picture tubes generally require 1000v per inch of
tube. As such, use EXTREME caution when working with this equipment -
these voltages are not only dangerous, but LETHAL if handled improperly. YOU HAVE BEEN WARNED!
Introduction
So you have an arcade monitor with a dusty, dirty, busted, scratched,
burnt or otherwise worn out picture tube. One nice thing about many
classic arcade monitors is that despite being 25+ years old, a capacitor
kit and some light soldering can usually bring them back to life and
working perfectly again. Unfortunately, the same cannot be said about
the actual picture tubes on these monitors. If the tube doesn't get
scratched or broken from being moved around, most often the phospher
coating inside the tube gets burnt from spending many hours displaying
the same images or graphics. One of most notorious games are the Pac
Man/Ms Pac Man series, with the maze often burned so bad into the
monitor that it looks like its on when its really off.
Combined with the fact that new CRT monitors are starting to get hard
to come by, many arcade enthusiasts try what they can do recycle their
old monitors and make them work again. One good (or bad) thing about the
digital tv conversion in 2009 is that many older tvs are being retired
for new, digital flat panel tvs. This means, at least for now, that
donor CRT tvs are put out to the curb, or sent to recycling
centers/thrift shops and thankfully many have perfectly good picture
tubes that can be swapped into an arcade monitor.
Is my tube really bad?
Often, most people think if a monitor goes blank or otherwise fails,
its the tube thats bad. Back in the 50s,60s, and 70s, that was the case
with tvs that ran on vacuum tubes, and yes, a picture tube IS a vacuum
tube itself, however, its somewhat rare for a tube to actually go bad
outside of being damaged. Don't let that fool you though, they DO go
bad, its just not as often as one assumes. So what type of symptoms does
a bad tube demonstrate? Let's see...
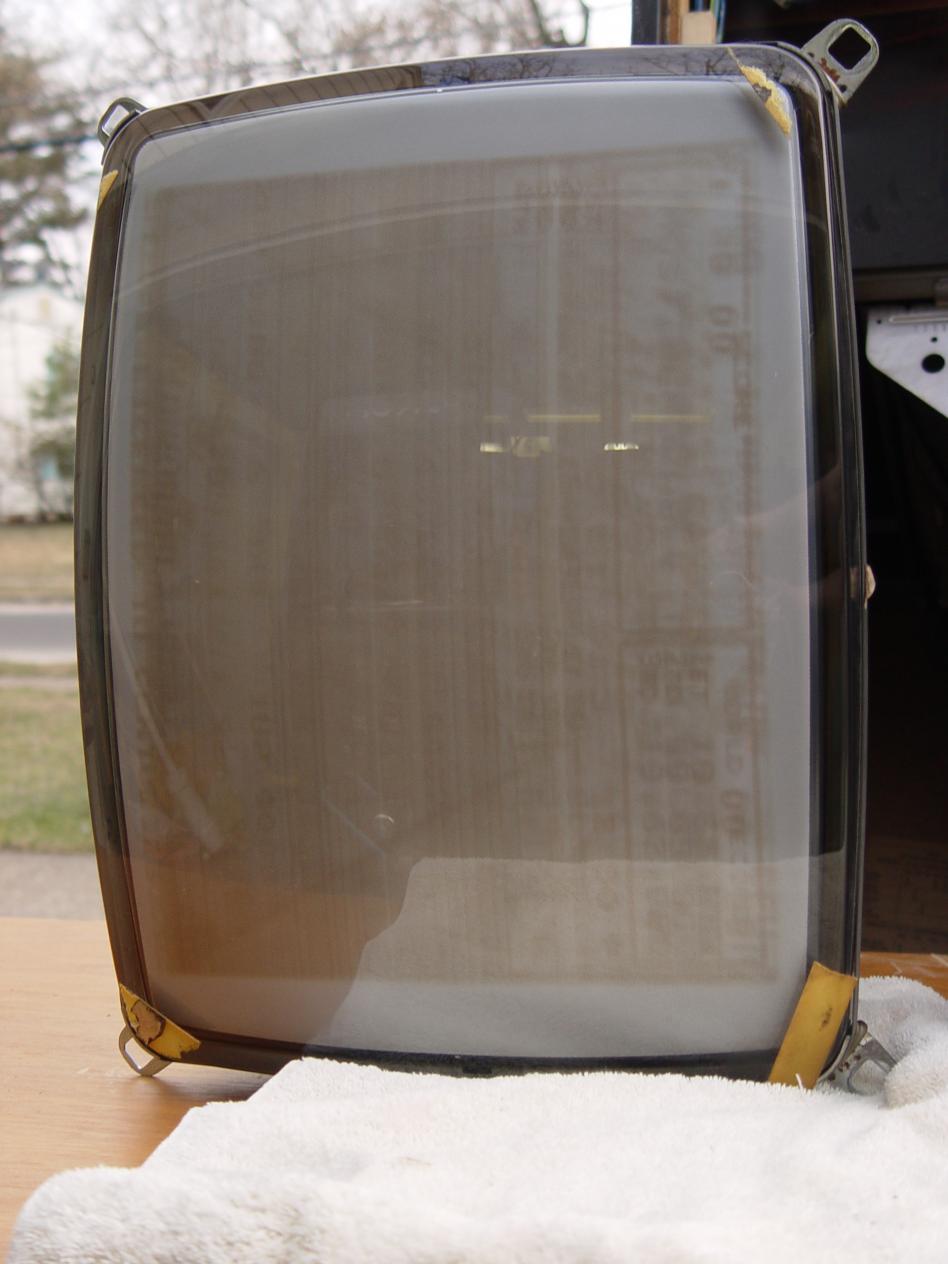
Screen Burn
Typical screen burn, and probably the most popular reason for
swapping a tube. The inside of the face of the tube is coated with
phospher, which glows to make the picture you see. When a picture tube
displays the same image year after year, the phospher gets "burnt" from
overuse, causing the damage you see. Outside of expensive specialized
repair centers, there is no fixing the tube - simply replace and move
on.
(Click the picture for a closeup)
 Physical Damage Physical Damage
Unfortunately, while picture tubes have extremely thick glass on the
face, the necks on the back are actually pretty fragile, and the
open-frame design of arcade monitors leave the neck unprotected and
prone to being broken. Once this happens, air enters the tube (with a
hissing sound), and the tube is trash. Sometimes if you can't tell its
been broken, you will see or hear a blue glow or high voltage arc inside
the neck when the monitor is powered on. If you see this, turn it off
asap, as the tube is already bad and the arcing can potentially hurt the
chassis or other nearby components if left on.
(Sadly, the day I started to write this article, I accidentally
broke a tube on a monitor I was giving to a friend. A box bumped the
neck board, and the ever-so-sorry "hisssss" sound announced its demise.
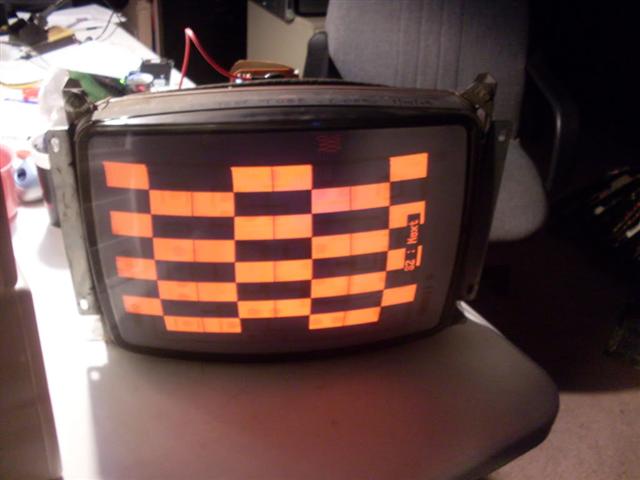 Poor Image Quality Poor Image Quality
Poor image quality is another popular reason for swapping a tube.
Sometimes heat, use and abuse just take its toll and the tube does
indeed go bad. Also, impurities left behind in manufacturing can also
internally short the tube, causing a gun to not work (color missing).
Believe it or not, tubes can sometimes be "rejuvinated" using a special
CRT rejuvenator tool. The rejuvenator zaps the tube in certain ways to
try to clean out any shorts and bring the tube back to life, kind of
like smashing the gas pedal in a car to "clean out the carbon". Many
have had success with rejuvenators, especially for hard to find tubes
such as those for color vector monitors.
The pic above, while at first glance looks ok, has several problems.
First, the tube is burnt and you can see the burned lines in the
picture. Secondly, its missing green and blue, and is somewhat out of
focus. Note that poor image quality is in the eye of the beholder,
and often the chassis is usually to blame. Test the chassis as best you
can (preferablly on a known-good tube) before blaming the tube for the
problem.
So how does one find a suitable donor tv, and what exactly makes a donor tv better than another? Let's continue...
Choosing a Donor...
Most 1980s arcade games run at standard definition TV resolution of
320x240, which is why tvs are good donors for arcade monitors. However,
there's an abundance of computer monitors, even in 19in sizes out there
readily available for free. Unfortunately, newer computer monitors that
are VGA and better are much higher resolution, and therefor the tubes
aren't compatible in most cases. For *most* arcade games, stick with
standard tvs as your potential donors.
Crunching the numbers...
Keeping in mind that this DIY tube swap article is not an exact
science, you may often replace a tube that has one number with another
of a different number. What exactly do these numbers mean? Do they have
to match? Many articles I've read go into various explanations, and some
may be wrong and others may be right, but I do know this much. Often
the first 2-3 characters of the number denote the SIZE of the tube, the
next 2-3 characters may denote the type of guns or the type of phospher,
and vice versa. Long story short, if the size is correct, and the
socket is the same time (See below), there's a good chance it'll work.
Again, this is a hit-or-miss process and 2 physically identical tubes
can be different in many ways!
Note: From what I've read, having the proper tube for a VECTOR
monitor is important. Vector monitors, such as those for games like
Asteroids, Asteroids Deluxe, Tempest, Space Dual, Black Widow, Star Wars
and others are in some cases a higher resolution tube, and therefore
are more sensitive to the actual makeup of the tube itself. For these,
its important to match the numbers as best you can (if not perfectly).
Size does matter...
Monitors, tvs, and obviously picture tubes come in all sorts of
shapes and sizes. Thankfully there are a few standard sizes, and the
arcade monitors follow those standards in most cases. The three most
often found sizes are 13", 19", and 25". Some newer games even use 27"
tubes and larger.
13" monitors are usually used in cocktail table games, cabarets, slot machines, and poker games
19" monitors are the most popular and use for most standard arcade video games
25" monitors are used for larger games, such as Neo Geo, Dynamo cabinets, fighting and shooting games
Why do we need to know this? Well you obviously can't put a 25"
picture tube in a 13" monitor, so we need to know how to find the right
SIZE tube for the job.
One easy way to tell the size is to look at the tube number. Some
older or American tubes may have a number like 19 or 20 at the beginning
- that is the size in inches. Asian tubes (most) use metric numbers, so
a 48 would be a 19" tube, 51 a 20" tube, and so on. Use this table to
identify the size of the tube...
Begins with 19, or A48 - 19" tube
Begins with 20, or A51 - 20" tube
Begins with 25, or A67 - 25" tube
NOTE: While 20 inch tubes are almost identical physically to 19"
tubes, they often do not fit in arcade monitor frames due to the
slightly larger dimensions. I've mistaken many 20 inch tvs as 19in.
TIP: When browsing thrift stores or recycling centers, look for TVs
that have a 19 in their model number. Very often these are true 19in
tvs. If the model number has 20, there's a 50-50 chance it's a 20in tv
and should be avoided unless you can verify the tube number.
TIP: Use an LED penlight to try to see the tube number through the
vents in the back. Usually the tube number is on the left or right side
of the tube. This works well when shopping in a thrift store where you
can't exactly take each tv apart.
The square peg doesn't fit in the round hole (SOCKETS)...
The next consideration when hunting for a tube is the socket type.
Tubes have different sockets based on the manufacturer of the tube,
monitor, or tv. Most often the sockets use a universal pinout, so if the
socket types match between 2 tubes, the replacement tube will most
likely be compatible.
The first key thing about sockets is the size. While most arcade
monitors and older tvs had picture tubes with thicker necks, modern CRT
tvs have thin necks and subsequently, thinner sockets. This makes them
not compatible with a majority of older monitors. Do note though that
some arcade monitors did use thin-neck tubes, the Wells-Gardner 1972
comes to mind. Again, use a pen-light to look through the vents. If the
neck is about an inch and a half in diameter, its a thick-neck tube. If
its about an inch or so in diameter, its a thin-neck tube.
Next is the socket type. Different types use different patterns for
the pins, and numbers of pins. The easiest way to figure out what type
of socket a tube uses is actually to use the manual to a popular
rejuvenator - the B&K Precision 470. They use a number system
to note what type of socket a tube has, and as such, the information is
extremely helpful when comparing a possible donor with a patient. Simply
look up both tubes in the manual, and if the socket numbers are the
same, its a match! Of course in a pinch, just try gently fitting the
neck board into the new tube. If it slides on with minimal effort,
chances are its a match.
Tip: Most popular 19" arcade monitors use tubes with Socket #s CR-23 or CR-31
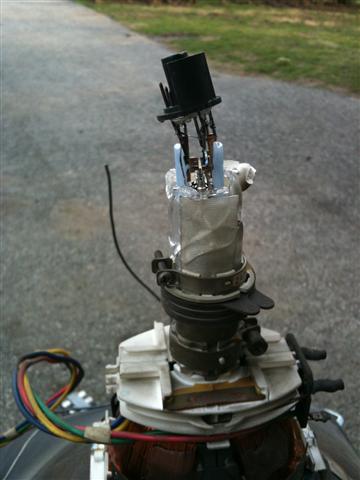
The Yoke is the Best Part...
The next consideration of a tube swap, and often the most important,
is the yoke. The yoke is the copper-colored round thing on the back of
the tube that looks like it'll knock you into next month if you grab it
wrong (and it certainly can). Its an electromagnet that pulls around the
beams inside the tube to draw the picture on the screen. While
the yokes are usually mounted on the back of the tube and look like a
permanent fixture, they actually come off (pretty easy sometimes), and
are technically a seperate piece from the tube itself. Yokes are
electrically matched to the monitor chassis, and have different specs
from each other. You cannot expect to simply drop a tube and yoke out of a random tv into a random monitor and have it work.
Some people get lucky, yes, but most do not. In addition, there ARE
some yokes that ARE permanently attached to the tube. These are uncommon
but do occur from time to time.
So how can you tell if a yoke is compatible? There's 4 wires usually
coming off a yoke, 2 wires for each directional coil (horizontal and
vertical). The horizontal coil wires are often red and blue (almost
every time), whereas the vertical coils can be various colors, like
yellow and green. Although its not an exact science, simply comparing
the resistance of each coil is enough to prove compatibility. Using a
digital multimeter, measure the resistance (OHMS) across the red and
blue wires, and then the yellow and green wires. Again the resistance
across red and blue will be your "horizontal" reading, and the other
pair the "vertical reading".
IMPORTANT FACT: Usually if a yoke is within an ohm or two of the
original yoke for BOTH readings, it may work ok. If one reading is
drastically different, like 10 or more ohms, that yoke is not compatible
and the original must be swapped to the new tube. If you get lucky and
find a yoke that's compatible - leave it on the new tube.
Yoke Plugs - The next consideration is the plug on the yoke wires.
Usually most tvs and monitors use only a few different types of plugs.
If the new tube has a yoke thats compatible but the plug is not the
same, simply do what you can to safely swap the plugs from one yoke to
the other, taking care to keep the red/blue and yellow/green wires the
same.
Backwards Picture - If you get either an
upside-down picture or a backwards/mirror-image picture, each half of
the yoke plug can be reversed to correct it. If the picture is upside
down, reverse the red/blue wires by cutting the plug in half and
spinning JUST the red/blue side. If the picture is backwards or a
mirror-image, spin JUST the yellow/green side. Again, do not reverse the
two halfs (red/blue where yellow/green should be) - if you do,
fireworks will ensue!
To Summarize...
- Best sources of donor tubes are old tvs from the early 80s to the
mid to late 90s. Computer monitors are different and often aren't
compatible.
- If a tube is the same size, and the same socket, chances are it'll work
- 20in tubes in most cases do not fit arcade monitor frames.
- Tube numbers outside of the first few letters/numbers don't have to
match, but for VECTOR monitors that require special tubes, they should
- Yokes must be electrically matched to the chassis - if the
resistance readings are off by more than a couple ohms, the old yoke
must be swapped
The SWAP...
Click here to continue on to PART 2 - The SWAP!!
Thanks/Credits: Many thanks to the KLOV forums for providing the
know-how to write this article (and do several succesful tube swaps
myself).
Copyright 2010 Junknet.net
|
 Picture Tube Swap DIY - Part 1


